
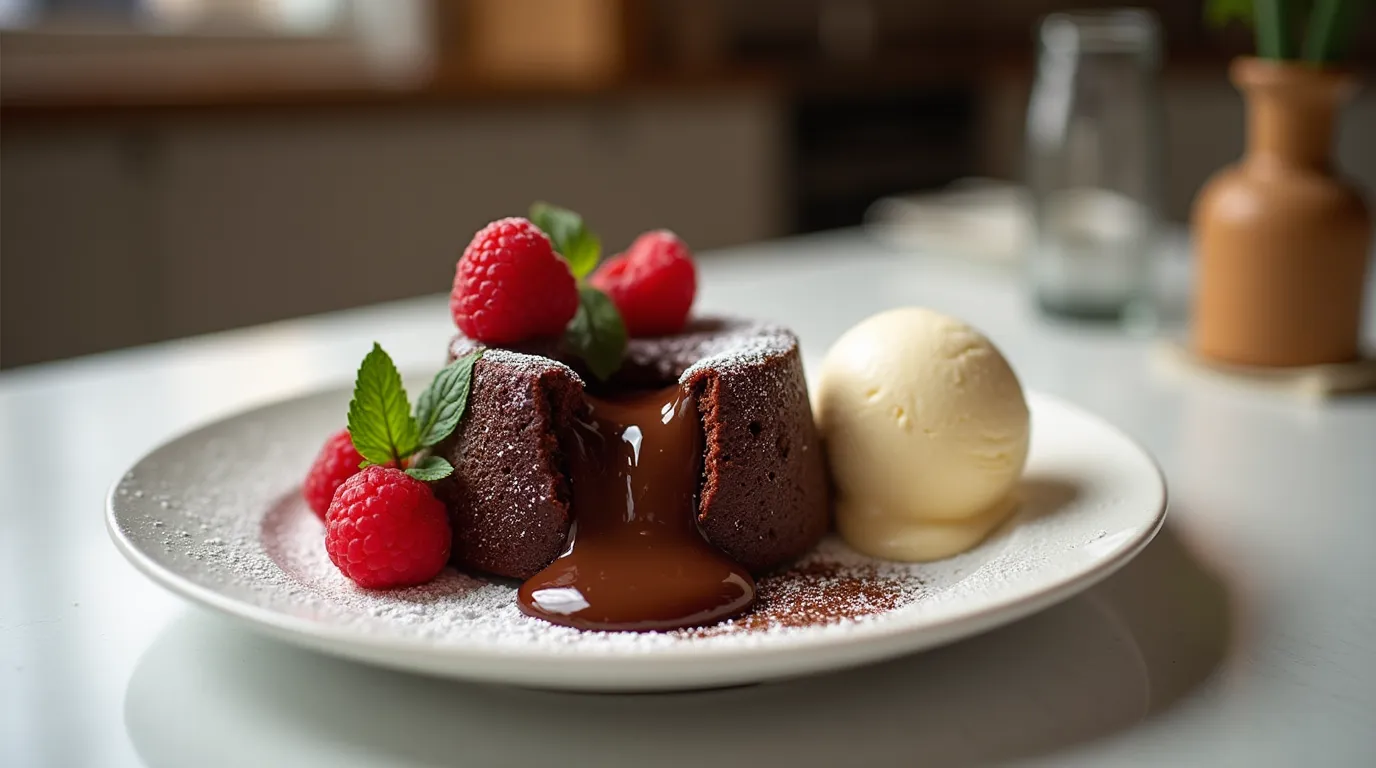
There’s something truly magical about cutting into a perfectly baked chocolate fondant and watching that rich, gooey center flow out like a sweet, indulgent surprise. But let’s be honest—getting it just right can feel like a high-stakes baking challenge. Have you ever pulled a fondant out of the oven, only to find it overcooked or, worse, collapsed? You’re not alone!
In this guide, we’re diving into the most common chocolate fondant mistakes and how to avoid them, so you can confidently whip up this show-stopping dessert every time. Whether you’re a baking newbie or a seasoned pro, these tips will help you master the art of the perfect chocolate fondant—crisp on the outside, luxuriously molten on the inside, and utterly irresistible. Ready to impress your guests (or just treat yourself)? Let’s get started
Table of Contents
Key Benefits of Mastering Chocolate Fondant
There’s a reason chocolate fondant is a dessert superstar—it’s decadent, impressive, and surprisingly simple once you know the secrets. But before we dive into the recipe, let’s talk about why mastering this dessert is worth your time (and chocolate stash!).
- Crowd-Pleasing Wow Factor: Imagine serving a dessert that oozes rich, molten chocolate at the first spoonful. It’s guaranteed to earn you compliments and maybe even a few recipe requests!
- Quick and Versatile: Unlike many fancy desserts, chocolate fondant comes together in under an hour. Plus, it’s endlessly customizable—add a hint of espresso, a splash of liqueur, or even a sprinkle of sea salt for a gourmet twist.
- Baking Confidence Boost: Nailing this recipe will make you feel like a pastry pro. Once you learn the tricks to avoid common pitfalls, you’ll have a go-to dessert for any occasion.
But here’s the best part: with the right guidance, you can avoid the usual frustrations—like a dry center or a fondant that sticks to the pan. Ready to unlock the secrets to chocolate fondant perfection? Let’s move on to the ingredients you’ll need to make magic happen!
Ingredients for the Perfect Chocolate Fondant
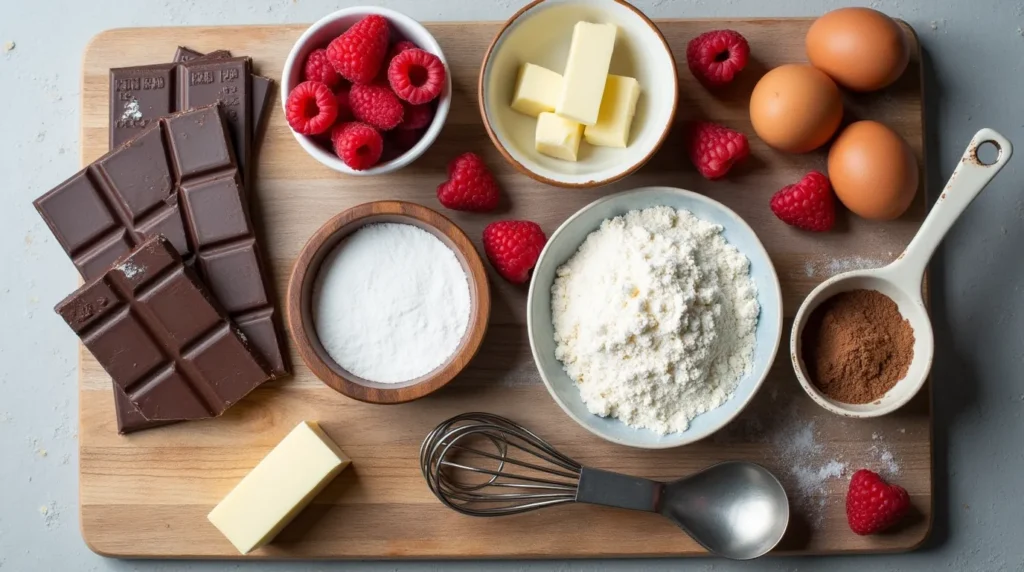
The secret to a flawless chocolate fondant lies in using the right ingredients—and yes, quality matters here! Don’t worry, though; you won’t need a long shopping list. These simple, pantry-friendly items come together to create a dessert that’s rich, indulgent, and utterly unforgettable.
Here’s what you’ll need:
- Dark Chocolate (70% cocoa): 200g. This is the star of the show, so choose a high-quality chocolate for the best flavor and texture.
- Unsalted Butter: 100g, plus extra for greasing. Butter adds richness and helps achieve that perfect melt-in-your-mouth consistency.
- Granulated Sugar: 100g. Just enough sweetness to balance the bitterness of the dark chocolate.
- Eggs: 2 large eggs plus 2 egg yolks. The extra yolks give the fondant its luxurious, velvety texture.
- All-Purpose Flour: 50g. A small amount helps stabilize the fondant without making it cakey.
- Cocoa Powder: For dusting the ramekins. This prevents sticking and adds a subtle chocolatey depth.
Pro Tip: If you’re feeling adventurous, you can swap out the dark chocolate for milk chocolate or add a splash of vanilla extract, orange zest, or even a pinch of chili for a unique twist.
Gather your ingredients, and let’s move on to the fun part—bringing this chocolatey masterpiece to life
Step-by-Step Instructions
Ready to create a chocolate fondant that’s as impressive as it is delicious? Follow these easy steps, and I’ll guide you through the process with tips to ensure success. Let’s turn that dreamy, molten-centered dessert into a reality!
Step 1: Prep Your Ramekins
- Generously grease your ramekins with butter, making sure to cover every inch.
- Dust the insides with cocoa powder, tapping out any excess. This step is your insurance policy against sticking and ensures a clean release.
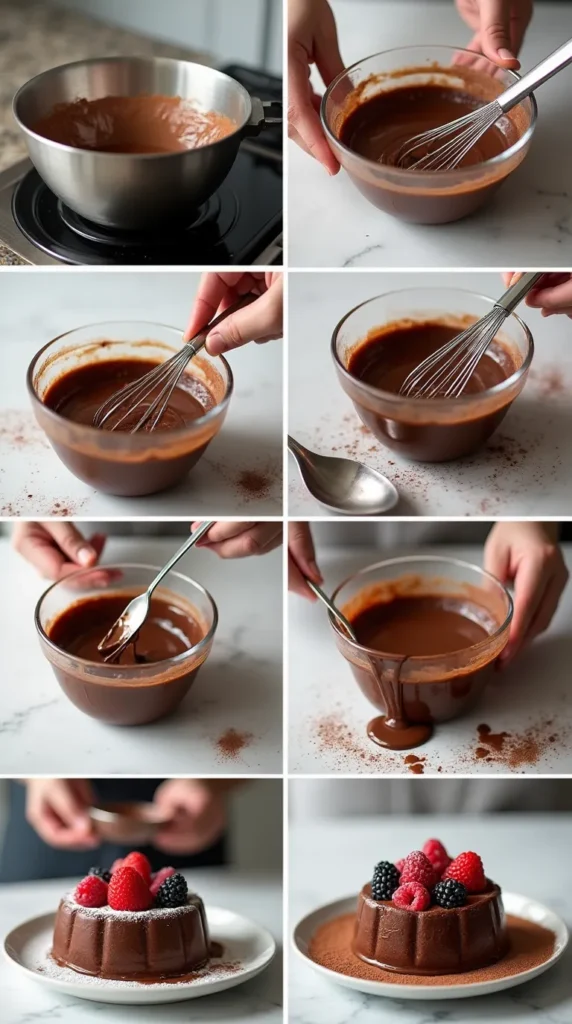
Step 2: Melt the Chocolate and Butter
- In a heatproof bowl, combine the dark chocolate and unsalted butter.
- Melt them together using a double boiler or microwave in 20-second bursts, stirring until smooth and glossy. Let it cool slightly—this prevents the eggs from cooking when mixed in.
Pro Tip: If using a microwave, stir frequently to avoid overheating, which can cause the chocolate to seize.
Step 3: Whisk the Eggs and Sugar
- In a separate bowl, whisk the eggs, egg yolks, and sugar until the mixture is pale, slightly frothy, and has a ribbon-like consistency. This adds air, giving your fondant a light, delicate texture.
Step 4: Combine the Mixtures
- Gradually fold the melted chocolate mixture into the egg mixture, stirring gently until fully combined.
- Sift in the flour and fold it in until just incorporated. Overmixing can make the fondant dense, so a light hand is key here.
Step 5: Bake to Perfection
- Divide the batter evenly among the prepared ramekins, filling them about three-quarters full.
- Bake in a preheated oven at 180°C (350°F) for 10–12 minutes. The edges should be set, but the center should still jiggle slightly when you gently shake the ramekin.
Pro Tip: Baking time is critical—overbaking will give you a cake, not a fondant! Start checking at the 10-minute mark to avoid disappointment.
Step 6: Serve Immediately
- Let the fondants cool for 1–2 minutes, then run a knife around the edges to loosen them.
- Invert each ramekin onto a plate, tap gently, and lift to reveal your masterpiece. The fondant should slide out smoothly, revealing its molten center.
And there you have it—a perfectly baked chocolate fondant that’s crisp on the outside and gloriously gooey on the inside. Ready to add your own creative flair? Let’s explore some pro tips and variations next!
Pro Tips and Variations for Chocolate Fondant
Now that you’ve nailed the basics, let’s take your chocolate fondant skills to the next level! Whether you’re looking to avoid common pitfalls or experiment with exciting flavors, this section is packed with tips and ideas to make your fondant truly unforgettable.
Pro Tips for Flawless Fondant
- Timing is Everything: The difference between a molten center and a dry cake is just a minute or two. Set a timer and start checking your fondants at the 10-minute mark. The edges should be set, but the center should still jiggle slightly.
- Grease Like a Pro: Don’t skimp on butter and cocoa powder when prepping your ramekins. This ensures your fondants release cleanly and look picture-perfect.
- Room Temperature Ingredients: Make sure your eggs and butter are at room temperature before starting. This helps create a smooth, evenly mixed batter.
- Chill the Batter: If you’re not baking right away, cover the batter and refrigerate it for up to 24 hours. This can even enhance the flavor and make the fondants easier to handle.
Flavor Variations to Try
Why stick to classic when you can get creative? Here are some delicious twists to make your chocolate fondant uniquely yours:
- Citrus Zest: Add a teaspoon of orange or lemon zest to the batter for a bright, refreshing contrast to the rich chocolate.
- Spiced Fondant: Mix in a pinch of cinnamon, chili powder, or cardamom for a warm, spicy kick.
- Nutty Delight: Fold in finely chopped hazelnuts, almonds, or pecans for added crunch and depth.
- Boozy Indulgence: Stir in a tablespoon of your favorite liqueur—think Grand Marnier, Baileys, or amaretto—for an adult-only treat.
Dietary Adaptations
- Gluten-Free: Swap the all-purpose flour for a gluten-free blend or almond flour.
- Dairy-Free: Use dairy-free chocolate and a plant-based butter substitute. Just ensure they’re high-quality for the best results.
Storage and Reheating Tips
- Make-Ahead: Prepare the batter and store it in the fridge for up to 24 hours. Bake just before serving for the freshest results.
- Reheating: If you have leftovers (unlikely, but possible!), reheat in the microwave for 10–15 seconds to restore the gooey center.
With these tips and variations, you’re well-equipped to create a chocolate fondant that’s uniquely yours. Ready to plate up and impress? Let’s move on to some stunning serving suggestions!
Serving Suggestions
You’ve baked the perfect chocolate fondant—now it’s time to make it shine! Presentation and pairing can elevate your dessert from delicious to unforgettable. Here are some creative and mouthwatering ideas to serve your fondant like a pro.
Classic Pairings
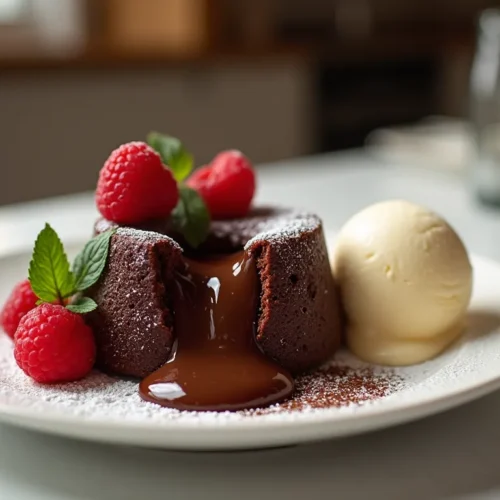
- Vanilla Ice Cream: A scoop of creamy vanilla ice cream is the ultimate contrast to the warm, gooey fondant. The cold-meets-hot combo is pure bliss.
- Fresh Berries: Add a pop of color and freshness with a handful of raspberries, strawberries, or blueberries. Their tartness balances the richness of the chocolate.
- Whipped Cream: A dollop of lightly sweetened whipped cream adds a luxurious touch without overpowering the fondant’s flavor.
Gourmet Twists
- Caramel Drizzle: Drizzle warm caramel sauce over the fondant for an extra layer of sweetness and decadence.
- Sea Salt Sprinkle: A pinch of flaky sea salt on top enhances the chocolate’s depth and adds a sophisticated finish.
- Mint Garnish: Fresh mint leaves or a drizzle of mint syrup can add a refreshing twist to your dessert.
Plating Ideas
- Dust with Cocoa Powder: Lightly dust the plate with cocoa powder or powdered sugar for a professional, restaurant-worthy look.
- Chocolate Shavings: Use a vegetable peeler to create delicate chocolate curls for an elegant garnish.
- Edible Flowers: A few edible flowers (like pansies or violets) can turn your fondant into a stunning centerpiece
Perfect for Special Occasions
- Dinner Parties: Serve individual fondants on elegant plates with a side of ice cream and a sprig of mint for a show-stopping dessert.
- Date Night: Pair with a glass of red wine or dessert wine for a romantic, indulgent treat.
- Holiday Feasts: Add a festive touch with seasonal garnishes like cranberries, pomegranate seeds, or a dusting of cinnamon.
With these serving suggestions, your chocolate fondant will not only taste amazing but also look like it belongs in a gourmet restaurant. Ready to dig in? Let’s wrap things up with a quick conclusion and answer some common questions!
Conclusion – Mastering the Art of Chocolate Fondant
Congratulations! You’ve just unlocked the secrets to creating a chocolate fondant that’s as impressive as it is delicious. Whether you’re baking for a special occasion or simply treating yourself, this dessert is sure to leave a lasting impression.
Here’s a quick recap of what makes this recipe a winner:
- Simple Ingredients: With just a handful of pantry staples, you can create a dessert that feels luxurious.
- Quick and Versatile: From classic to creative variations, this recipe adapts to your taste and occasion.
- Crowd-Pleasing Appeal: That molten center never fails to wow guests or satisfy your chocolate cravings.
Remember, practice makes perfect. Don’t be discouraged if your first attempt isn’t flawless—every baker learns through trial and error. With the tips and tricks you’ve picked up here, you’re well on your way to becoming a chocolate fondant pro.
So, what are you waiting for? Preheat that oven, grab your ramekins, and let the magic begin. And if you have any questions along the way, check out the FAQs below for extra guidance. Happy baking
Chocolate Fondant Mistakes You Must Avoid Now
Ingredients
- Dark Chocolate 70% cocoa: 200g. This is the star of the show, so choose a high-quality chocolate for the best flavor and texture.
- Unsalted Butter: 100g plus extra for greasing. Butter adds richness and helps achieve that perfect melt-in-your-mouth consistency.
- Granulated Sugar: 100g. Just enough sweetness to balance the bitterness of the dark chocolate.
- Eggs: 2 large eggs plus 2 egg yolks. The extra yolks give the fondant its luxurious velvety texture.
- All-Purpose Flour: 50g. A small amount helps stabilize the fondant without making it cakey.
- Cocoa Powder: For dusting the ramekins. This prevents sticking and adds a subtle chocolatey depth.
Pro Tip:
- If you’re feeling adventurous you can swap out the dark chocolate for milk chocolate or add a splash of vanilla extract, orange zest, or even a pinch of chili for a unique twist.
- Gather your ingredients and let’s move on to the fun part—bringing this chocolatey masterpiece to life
Instructions
Step 1: Prep Your Ramekins
- Generously grease your ramekins with butter, making sure to cover every inch.
- Dust the insides with cocoa powder, tapping out any excess. This step is your insurance policy against sticking and ensures a clean release.
Step 2: Melt the Chocolate and Butter
- In a heatproof bowl, combine the dark chocolate and unsalted butter.
- Melt them together using a double boiler or microwave in 20-second bursts, stirring until smooth and glossy. Let it cool slightly—this prevents the eggs from cooking when mixed in.
- Pro Tip: If using a microwave, stir frequently to avoid overheating, which can cause the chocolate to seize.
Step 3: Whisk the Eggs and Sugar
- In a separate bowl, whisk the eggs, egg yolks, and sugar until the mixture is pale, slightly frothy, and has a ribbon-like consistency. This adds air, giving your fondant a light, delicate texture.
Step 4: Combine the Mixtures
- Gradually fold the melted chocolate mixture into the egg mixture, stirring gently until fully combined.
- Sift in the flour and fold it in until just incorporated. Overmixing can make the fondant dense, so a light hand is key here.
Step 5: Bake to Perfection
- Divide the batter evenly among the prepared ramekins, filling them about three-quarters full.
- Bake in a preheated oven at 180°C (350°F) for 10–12 minutes. The edges should be set, but the center should still jiggle slightly when you gently shake the ramekin.
- Pro Tip: Baking time is critical—overbaking will give you a cake, not a fondant! Start checking at the 10-minute mark to avoid disappointment.
Step 6: Serve Immediately
- Let the fondants cool for 1–2 minutes, then run a knife around the edges to loosen them.
- Invert each ramekin onto a plate, tap gently, and lift to reveal your masterpiece. The fondant should slide out smoothly, revealing its molten center.
Notes
- Calories: 320 kcal
- Fat: 22g
- Saturated Fat: 13g
- Carbohydrates: 28g
- Sugar: 20g
- Protein: 6g
- Cholesterol: 120mg
- Sodium: 30mg
- Fiber: 3g
FAQs
Got questions about chocolate fondant? Don’t worry—I’ve got you covered! Here are answers to some of the most common questions to help you bake with confidence and avoid any mishaps.
1. Why did my fondant collapse when I took it out of the ramekin?
This usually happens if the fondant is underbaked or the ramekins weren’t properly prepared. To avoid this:
Bake until the edges are firm but the center still jiggles slightly.
Generously grease your ramekins with butter and dust them with cocoa powder for easy release.
2. Can I prepare the batter in advance?
Yes! You can make the batter up to 24 hours ahead and store it in the fridge. When you’re ready to bake, let it sit at room temperature for 10–15 minutes, or add an extra minute to the baking time if baking straight from the fridge.
3. How do I reheat leftover fondant?
While fondant is best enjoyed fresh, you can reheat leftovers in the microwave for 10–15 seconds to bring back the gooey center. Just be careful not to overheat it, as it can dry out.
4. Can I freeze chocolate fondant?
Yes, but it’s best to freeze the unbaked batter. Pour it into greased ramekins, wrap them tightly in plastic wrap, and freeze. When ready to bake, thaw in the fridge overnight and bake as directed, adding a minute or two to the baking time.
5. Why did my fondant turn out cakey instead of gooey?
This happens if the fondant is overbaked. Remember, the center should still jiggle slightly when you take it out of the oven. Start checking at the 10-minute mark to avoid overbaking.
6. Can I make this recipe gluten-free?
Absolutely! Swap the all-purpose flour for a gluten-free blend or almond flour. Just make sure the batter is smooth and well-combined before baking.
7. What type of chocolate works best?
High-quality dark chocolate with at least 70% cocoa content is ideal. It gives the fondant a rich, intense flavor and ensures that perfect molten center.
8. Do I have to use ramekins?
Ramekins are the best choice because they conduct heat evenly and make serving easy. However, you can use muffin tins or small cake pans if needed—just keep an eye on the baking time, as it may vary slightly.
With these FAQs, you’re all set to tackle chocolate fondant like a pro. Still have questions? Don’t hesitate to experiment and make this recipe your own. After all, baking is as much about creativity as it is about precision. Enjoy every bite
2 thoughts on “Chocolate Fondant Mistakes You Must Avoid Now”
Comments are closed.